
In order to pour concrete on slope, try to reduce the slump of concrete to make it less workable so the concrete won’t sag on its own weight. And once it’s there, you need to carefully screed the top of the concrete slowly and steadily. Make sure to start pouring from lowest point of the point and work yourself upwards.
Pouring sloped concrete slabs requires careful consideration of the slump, or consistency of the mixture. Too high of a slump will render too fluid a mixture for holding onto its slope; too low will increase difficulty. In this article we’ll look at selecting an appropriate slump for your project and offer tips for pouring sloped slabs.
Yes you can lay the concrete on a slope as a ramp but you need to adjust the slump value based on the degree of slope you have. For less steep or flatter slopes, the slump can be from range of 50 to 100 mm but for steeper slopes it must not be more than 75 mm. But for slopes more than 45 degrees you can either use double forming or increase the thickness of the concrete or use Shotcrete.
But that’s not all, there’s so much more thoughts in putting the concrete on a slope. So, I’m going to show you how to pour a slope with concrete, get it poured, get it screeded, get it both loaded, and then hang out for the end of the article so you can get some expert insights.
How to pour a pretty steep slope with concrete?
So, the first thing when you start pouring a slope with concrete like this is you got to pour the concrete dry enough so it doesn’t want to sag on you too bad.
Know the slump
So, there’s a fine line between the concrete being a little too wet and a little too dry.
Too dry mean it’s going to be hard to work with, and too wet meaning it’s just not going to hold its shape.
You know, the word slump is the measure of how dry or what the concrete is, with 1 inch being really, dry, almost like dirt, and then 10 being almost real wet like water.
Also Read: Advantages and Disadvantages of Cast in Situ Concrete Piles
Like Us on Facebook!
Testing the Slump
Before selecting an ideal slump for your project, it is necessary to conduct a concrete slump test. A slump test involves filling a bucket with concrete, compacting it down, and measuring its drop height or “slump.”
Subscribe Us on YouTube!
However, please keep in mind that measurement standards differ depending on where your project takes place; be sure to refer back to local concrete standards for more specific measurements methods.
Why dry slump?
Well, using a drier slump is actually good. If you’d use the normal slump or loose slump; you won’t be able to finish it properly. So, try to use a slump that’s normally drier than normal and it actually makes the pour easier because it doesn’t want to sag. If the concrete just keeps wants to keep sagging, then it actually makes the job a little bit harder.
Selecting an Appropriate Slump
When working with professional concrete suppliers, inform them of your working conditions so they can select an ideal concrete slump for you. However, if mixing the concrete yourself you may follow some suggestions below according to slope of your slab.
Slope Less than 10deg
Concrete slabs with slopes less than 10 degrees should use a concrete with a slump of more than 3 inches for small projects such as stairs, ramps and terraces; high-slump concrete can even be used if the slope exceeds 10deg; however formwork must first be set up to ensure control of slope.
Slope 10deg-30deg
Suggested Slump Selection Range for Concrete Slopes When creating a slope between 10deg and 30deg, an approximate slump selection range of 2-3 inches should be used as the basis of selecting concrete materials for use on it.
Slope Greater Than 30deg
For slopes of 30 degrees or more but less than 45deg, concrete with 1-2 inch drop is typically selected as the material of choice for construction projects.
Shotcrete or double forming may also be employed when gradients exceed 45 degrees or even are vertical, such as tunnel walls and guard slopes.
Pouring Sloped Concrete
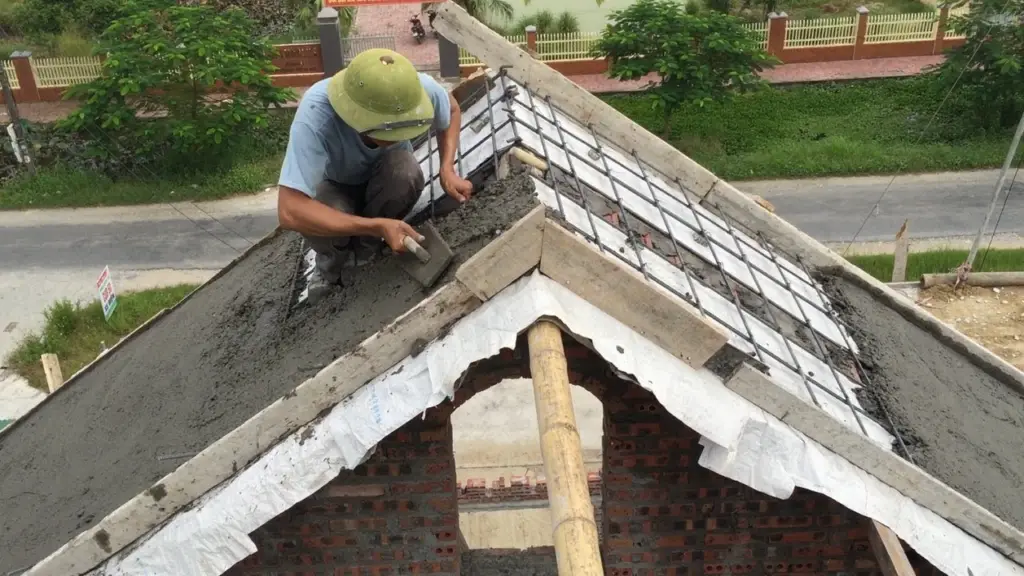
Pouring sloped concrete can be challenging depending on its size and angle of slope. When working on small domestic projects, formwork needs to be set up before using hand tools to complete the slope.
On larger industrial floors or car parks however, a laser screed can be used automatically level the concrete to match its slope set – saving both time and labor while providing more precise finishes.
Also read: Will Wd-40 remove rust from concrete? Here’s how to do it
Here’re the steps to pour concrete on a sloping driveway, floor, or roadway:
- Prepare the area: Remove any debris or vegetation on the area where you plan to pour the concrete. Ensure that the area is well compacted and leveled before proceeding.
- Set up the formwork: Construct a formwork that will hold the concrete in place while it sets. The formwork should be built to the desired slope angle and properly secured to prevent any movement during the concrete pouring process.
- Mixing: Depending on the slope angle, choose the right concrete mix with the appropriate slump to ensure the concrete will not be too fluid to hold the slope, nor too low in slump that it will make your work more difficult.
- Pouring: Begin pouring the concrete from the lowest point of the slope, working your way upwards. Use a concrete screed or a hand screed to level the concrete as you go, ensuring that it is evenly distributed throughout the formwork.
- Compacting: Use a compactor or a hand tamper to compact the concrete as you pour it to remove any air pockets that may form.
- Smooth the surface: After pouring and compacting the concrete, use a bull float or a hand trowel to smooth the surface of the concrete.
- Finish the surface: Depending on your desired finish, you can use a broom, a trowel or other tools to achieve the desired texture on the concrete surface.
- Curing: Once the concrete is poured, cover it with a plastic sheet or a curing compound to allow it to cure properly. This will ensure that the concrete achieves its full strength and durability.
Sloping Slab of Concrete for Easy Drainage
When pouring a concrete slab with a steep slope, it is critical that no vibrational leveling equipment be used; too much vibration may force too much concrete from holding down and cause downward flow.
A roller screed should instead be employed to level out the concrete; additionally, construction personnel on either side should walk smoothly using wood or scaffolding ladders for walking purposes.
Conclusion
Pouring sloped concrete slabs requires careful consideration of both the concrete slump and tools to use. Testing consistency of mixture and selecting an appropriate slump depending on slope of slab are both key steps in successful execution of this task, but with proper techniques and equipment sloped slabs can be completed efficiently and precisely.