
Let’s be honest for a second.
No matter how beautiful your home is — freshly painted walls, perfectly styled shelves, that dreamy neutral palette you worked so hard to choose — one thing always sneaks in and ruins the vibe:
Charging cables.
They snake across kitchen counters.
They hang off nightstands.
They collect dust behind sofas.
They tangle into a chaotic knot that somehow multiplies overnight.
And if you’re anything like me (especially if you care about home aesthetics, clean lines, and clutter-free surfaces), visible cords feel like visual noise.
But here’s the good news:
You don’t need to build a new house.
You don’t need custom cabinetry.
You don’t need to tear apart drywall.
You can turn your existing drawers and nightstands into hidden, fully functional charging hubs — and no one will ever see the wires.
Today, I’m walking you through everything:
- Why hidden charging hubs are a game-changer
- The tools and materials you actually need
- Step-by-step instructions
- Smart safety considerations
- Budget vs. luxury options
- How to adapt it for kitchens, bedrooms, entryways, and more
Let’s build something clever.
Why “Invisible” Charging Stations Are So Popular Right Now
Minimalism isn’t just a trend — it’s a lifestyle shift.
More people are:
- Reducing visual clutter
- Simplifying surfaces
- Designing intentional spaces
Yet our tech use keeps increasing.
Phones.
Tablets.
Smartwatches.
AirPods.
Portable speakers.
E-readers.
The average household has 15–25 charging devices.
So the real question becomes:
Where do they live when they’re not in use?
The answer used to be:
“On the counter.”
The better answer is:
“Inside a hidden charging hub.”
What Is a Hidden Charging Hub?
It’s exactly what it sounds like:
A drawer or nightstand that:
- Contains a power source
- Has organized cables inside
- Allows devices to charge discreetly
- Keeps surfaces completely clean
From the outside?
It looks like a normal drawer.
Inside?
It’s a fully functional tech station.
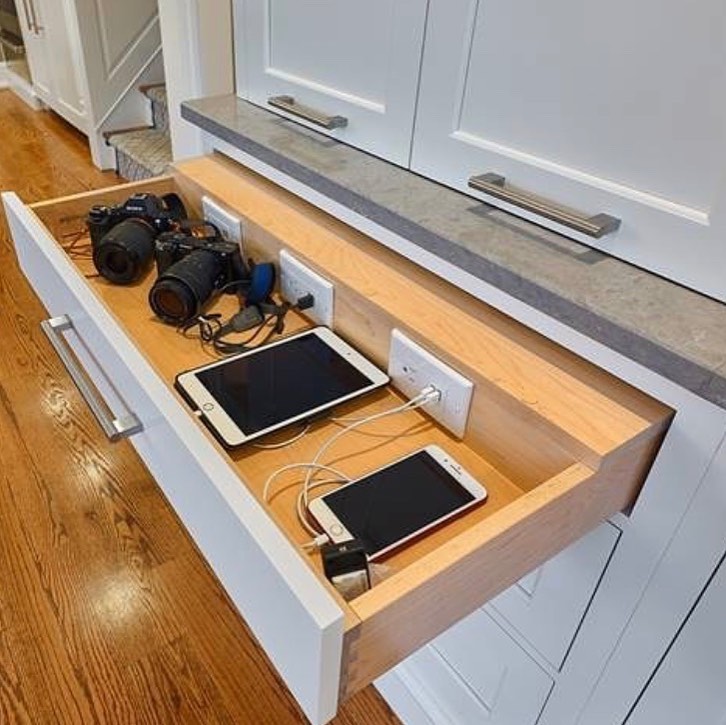
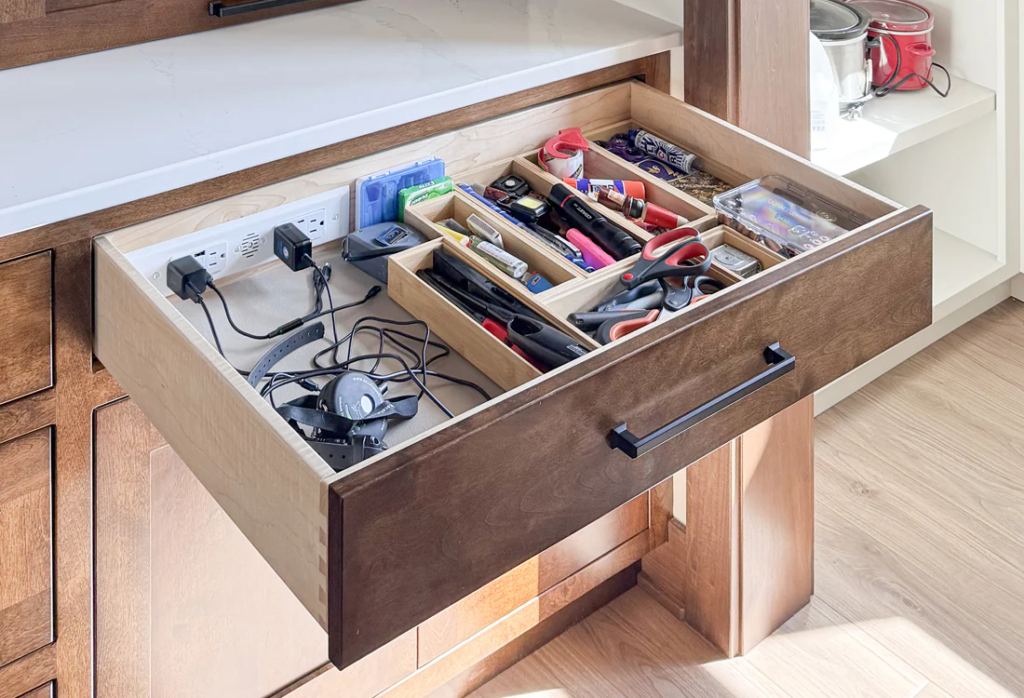
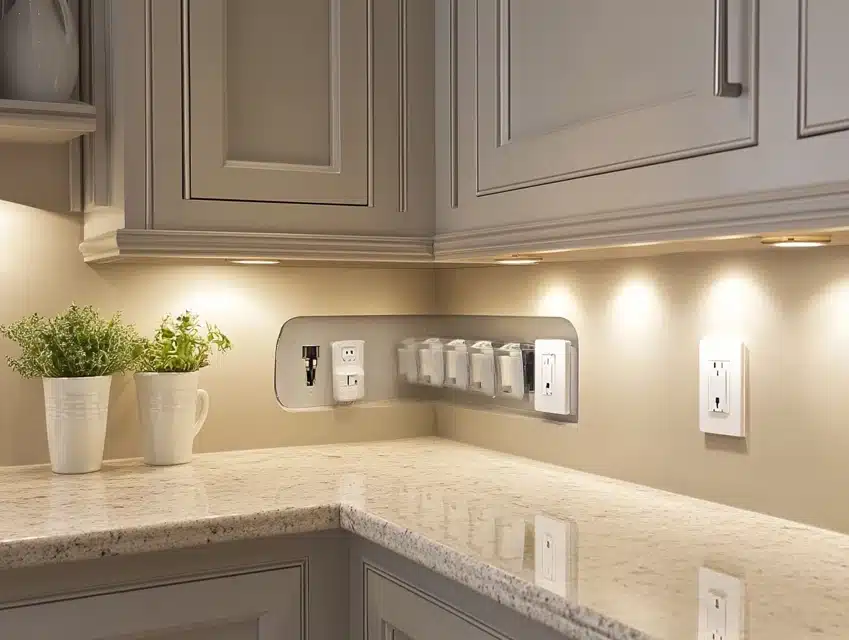
Part 1: The Kitchen Drawer Charging Station
Let’s start with the kitchen — because this is usually where the chaos lives.
Why the Kitchen?
The kitchen has:
- High foot traffic
- Shared family devices
- Counter clutter problems
- Outlets that are already nearby
And if you’ve ever tried to cook while moving chargers around, you know how annoying it gets.
Step 1: Choose the Right Drawer
Not all drawers are ideal.
Look for one that:
- Is near an outlet
- Is deep enough (at least 3 inches inside height)
- Isn’t used for essential cooking tools
- Opens fully (full-extension slides are best)
Pro tip:
Avoid drawers directly under the sink (moisture risk).
Step 2: Decide on Power Strategy
You have three main options:
Option 1: Drill a Small Hole to Run a Power Strip
This is the most common DIY method.
What you’ll do:
- Drill a 1–2 inch hole in the back of the drawer box
- Feed a slim power strip cable through it
- Plug it into the wall outlet behind the cabinet
- Secure the power strip inside the drawer
Best for:
- Budget-friendly setups
- Renters (if landlord allows minor drilling)
Option 2: Install a Recessed Outlet Inside the Cabinet
This is cleaner but requires light electrical work.
An electrician can:
- Add an outlet inside the cabinet space
- Allow the drawer to access internal power
- Keep everything hidden
Best for:
- Homeowners
- Kitchen remodel upgrades
Option 3: Use a Battery-Based Charging Dock
This avoids drilling entirely.
You charge the battery base periodically, and it powers devices inside the drawer.
Best for:
- Temporary setups
- No-drill apartments
Step 3: Install a Cable Grommet (Optional But Beautiful)
A grommet is that little plastic or metal ring that finishes a drilled hole.
It:
- Protects wires from rubbing
- Looks professional
- Keeps the drawer clean-looking
Choose:
- Black for modern kitchens
- Brushed nickel for contemporary
- White for minimal cabinetry
Step 4: Secure the Power Strip
This is important.
Never let it float loosely.
Use:
- Heavy-duty double-sided mounting tape
- Velcro strips
- Small screws (if allowed)
Keep it flat against the drawer base.
Step 5: Organize the Cables
Now comes the part that separates chaos from brilliance.
Inside the drawer:
- Use small cable clips
- Add divider trays
- Label cords
- Use short 6-inch charging cables
Short cables = no tangling.
Bonus: Add Ventilation
Electronics create heat.
To prevent overheating:
- Drill small 1/4 inch holes in the back of the drawer
- Or leave a small gap behind the cabinet
Don’t completely seal airflow.
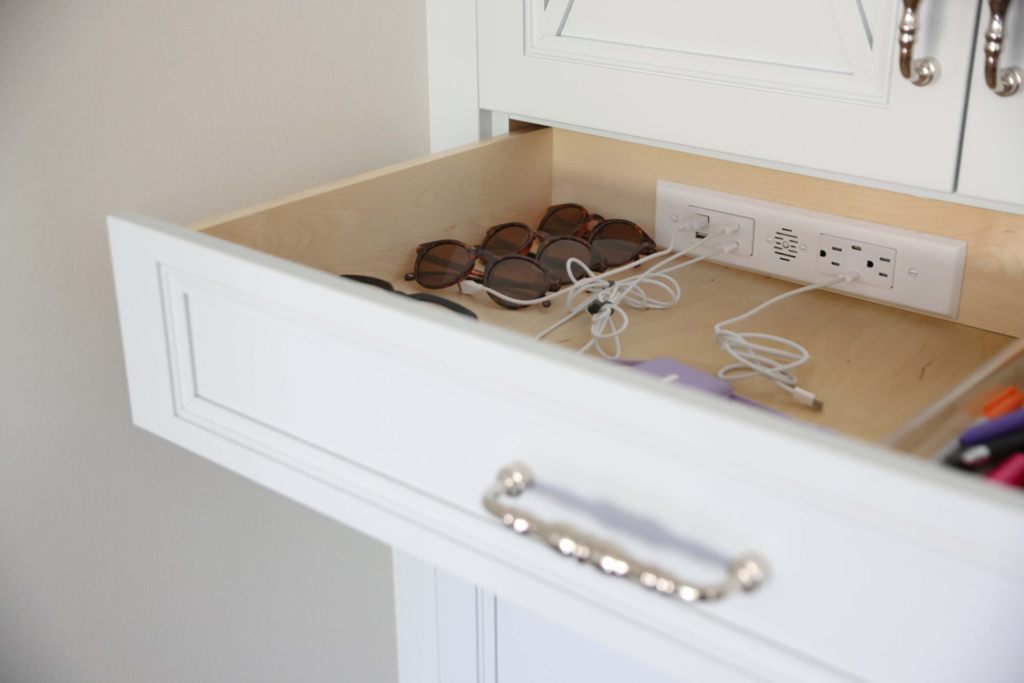
Part 2: The Nightstand Charging Station
Now let’s talk about bedrooms — where visible cords can ruin the entire calming vibe.
If you’ve ever styled your nightstand and thought:
“Why does it look messy?”
It’s probably the cables.
Why Nightstands Are Perfect for Hidden Charging
They’re already:
- Close to beds
- Near outlets
- Used for phones overnight
- Private (so hidden setups work well)
Simple DIY Nightstand Charging Hub
Here’s the easy version.
What You’ll Need:
- Slim surge protector
- Drill with hole saw bit
- Cable grommet
- Velcro strips
- Short charging cords
Step-by-Step:
- Remove the drawer.
- Drill a 1–2 inch hole in the back.
- Install the grommet.
- Feed power strip cord through.
- Secure the strip inside.
- Attach short charging cables.
- Add a soft liner to protect devices.
Done.
Now your phone charges inside the drawer.
Your nightstand top stays:
- Clean
- Calm
- Pinterest-worthy
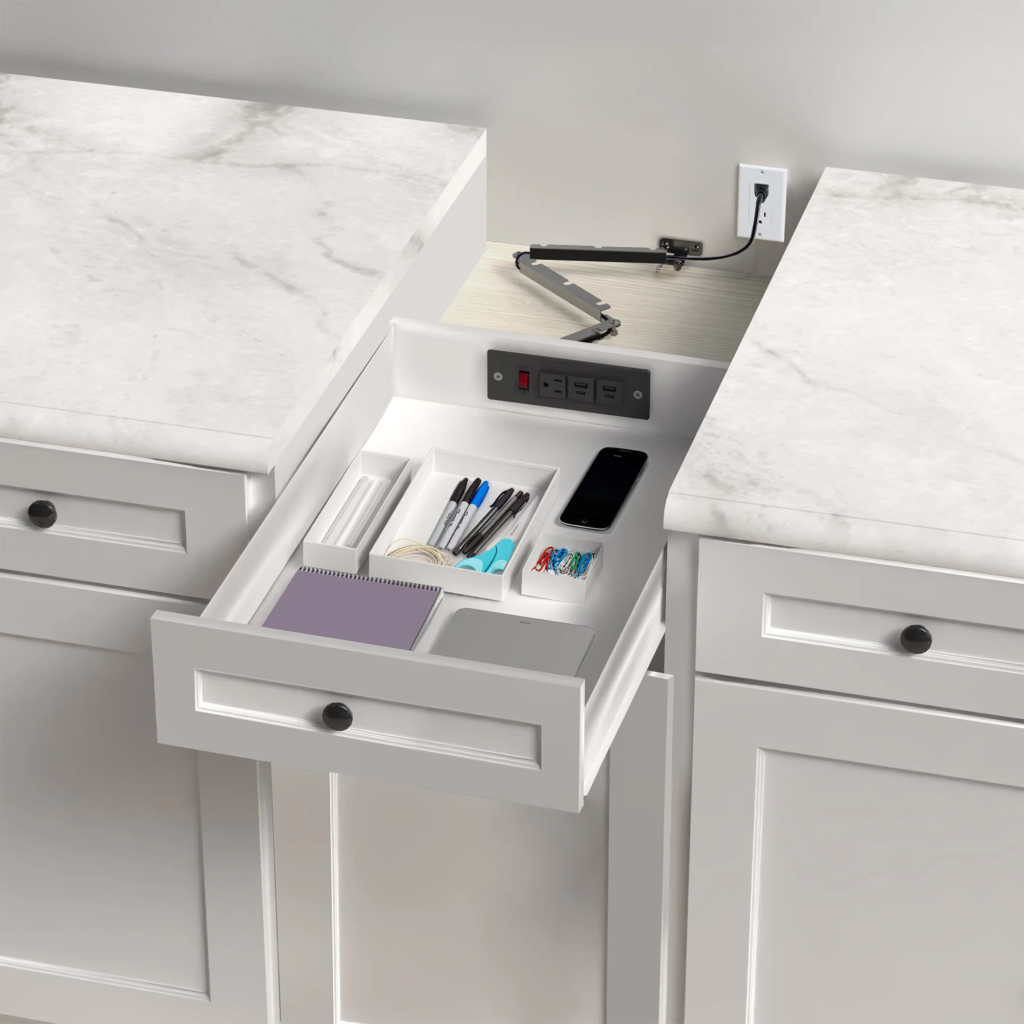
Advanced Upgrade: Wireless Charging Inside Drawers
Want next-level invisible?
Install a thin wireless charging pad under the drawer surface.
Here’s how it works:
- Mount the wireless charger under the top panel.
- Place your phone in the drawer.
- It charges through the wood (if thin enough).
Note:
Solid hardwood thicker than 3/4 inch may block charging.
Better with:
- MDF
- Plywood
- Veneer tops
Safety First (Please Read This)
This is important.
When adding power inside drawers:
- Always use a surge protector
- Never overload the strip
- Keep liquids away
- Avoid placing heat-producing devices (like laptops) in closed drawers
- Don’t block ventilation completely
If unsure about wiring, hire an electrician.
Clean design should never compromise safety.
Design Tips to Keep It Truly “Invisible”
Here’s how to make it feel intentional — not DIY.
Use Matching Hardware
Choose grommets that match your drawer pulls.
Hide the Wall Plug
Route the cord behind cabinetry or furniture legs.
Use Cable Shorteners
Long cables create mess.
Add Felt Liners
Protect screens and reduce noise.
Use Drawer Dividers
Separate:
- Phones
- Watches
- Earbuds
- Tablets
Budget Breakdown
Let’s talk cost.
Basic DIY Setup:
- Power strip: $15–30
- Grommet: $5–10
- Velcro/tape: $10
- Short cables: $20
Total: $50–75
Premium Custom Setup:
- Electrician install: $150–400
- Built-in outlet: $40–80
- Wireless charging pads: $30–100 each
Total: $250–700+
Still cheaper than custom cabinetry.
Where Else You Can Hide Charging Stations
Once you start thinking this way, you’ll see opportunities everywhere.
Entryway Console
Perfect for:
- Car keys
- Smartwatches
- AirPods
Mudroom Drawer
Charge:
- Kids’ tablets
- Portable gaming devices
Coffee Station Cabinet
Charge:
- Bluetooth speakers
- Smart displays
Home Office Drawer
Clean desk.
Hidden tech.
Common Mistakes to Avoid
Let’s prevent frustration.
❌ Using Deep Drawers With No Organization
Devices will pile up.
❌ Forgetting Ventilation
Heat buildup is real.
❌ Using Long Cables
Creates knots.
❌ Ignoring Surge Protection
Protect your devices.
The Psychological Benefit of Hidden Charging
This might sound dramatic, but it’s real.
Visible clutter = mental clutter.
When counters and nightstands are clear:
- Your brain relaxes
- The room feels bigger
- You sleep better
- You focus better
Especially in bedrooms.
A phone on top of a nightstand screams “notifications.”
A phone inside a drawer whispers “rest.”
If You’re Renting
You can still do this.
Use:
- Battery charging hubs
- Command-style adhesive mounts
- Pre-cut removable grommet inserts
No permanent damage required.
If You’re Renovating
This is the time to:
- Ask for internal cabinet outlets
- Add soft-close deep drawers for tech
- Design dedicated charging zones
It’s one of those small upgrades that feels luxurious daily.
Final Thoughts: Small Upgrade, Big Impact
Hidden charging hubs aren’t flashy.
They won’t impress guests instantly.
But they will:
- Simplify daily routines
- Reduce visual chaos
- Protect your devices
- Elevate your home’s design
And once you experience waking up to:
- A fully charged phone
- A perfectly styled nightstand
- Zero visible cords
You’ll never go back.
If you’re already into smart storage solutions and clean home design (like many of you who love decluttering and intentional decor), this is one of those projects that gives immediate satisfaction.
Start with one drawer.
Just one.
And watch how quickly it changes how your space feels.